Pages

Wednesday, 20 December 2017

Mudra Craft Stamps Website Launch

Hi Crafty Friends,

This is something really exciting that one of leading Indian craft stamps manufacturing Company 'Mudra Craft Stamps' going worldwide with very economical shipping rates.

Before I go further, I would like to give some insights about this Company if you are already not aware,

Mudra being an Indian stamp manufacturing company had been regularly launching best of craft stamps since its inception and also now they have launched their own stencils and recently launched their own papers (utterly beautiful) and cutting dies. Mudra also organizes challenges every month to encourage the crafters to showcase their creativity.

Now they have also launched their own website to cater to their international customers spreaded across the world.

This is something really huge and overwhelming to see our own people getting such recognition and doing wonders with best of capabilities of internal team and Design Team members in hand.

Also, they are doing giveaway to celebrate this milestone. Please go through the following link of their blog to get more idea about this amazing giveaway.
http://mudracraftstamps.blogspot.in/2017/12/hey-its-really-special-when-we-share.html


Link to Mudra Website that would lead you to their amazing products
https://mudrastamps.in/

Also, don't forget to go through their blog posts having superb creations of best DT members who worked with Mudra in past and working presently:
http://mudracraftstamps.blogspot.in/

Links to their other social media accounts to stay connected with their latest updates:

Youtube:
https://www.youtube.com/channel/UC5-CzS8Uy0fruW7JYhUX2gQ/videos
Facebook:
https://www.facebook.com/mudrastamps/
Instagram:
https://www.instagram.com/mudracraftstamps/
Pinterest:
https://in.pinterest.com/mudracraftstamp/

Hope that would take you to the beautiful journey of crafting world !!!

Enjoy!

Saturday, 2 December 2017

Shabby Layout

Hi Friends,

I am going to share a quick post on shabby chic layout.

Here is the look:


I had mainly used following supplies:
Papericious Ephemera paper pack
Papericious Butterfly chippies
Papericious Chalk paints - Pearl Pink & Bracket Green
Itsy Bitsy handmade flowers

I would like to briefly explain as to how I made this layout:

I tentatively arranged and decided all elements i.e. background paper, paper cut outs, chippies, flowers, leaves, etc till the time I am satisfied with the look of the layout. I distressed edges of cut outs, coloured the chippies using chalk paints and applied diamond dust using glossy accents. The photo displayed here doesn't justify beautiful sparkle and glittery look it gives.

Later, I layered and glued all elements. Lastly, I placed pink sequins on blue butterflies of patterned paper and randomly placed pink, purple and green sequins on background paper.

That results into beautiful layout that would be turned into photo frame. It depicts beautiful messages to capture precious moments and lifetime memories.

Hope you guys like this project.

Linking to following challenges:
Craftsneed November Challenge - Childhood Memories
4 Crafty Chicks Challenge#379 Anything Goes
Crafty Creations Challenge#355 Anything Goes
Creative Fingers Challenge#141
Crafts Gallore Challenge - Anything Goes
Love to Craft Challenge Blog LTCCB#17 Anything Goes


Friday, 10 November 2017

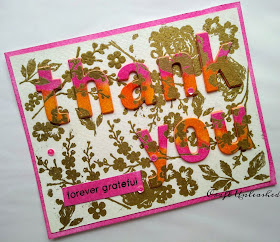
Thank You Card

Hi friends,

Today I am going to share a card with die cut inlay technique tried for the first time.

Here is the look:


I would like to explain how I created these cards.

1. I had created floral background using flowers & leaves from Itsy Bitsy-Hope and Smile stamp set and Mudra-Botanical Stamp set.

2. I took two cards, stamped and heat embossed the background using versamark stamp pad and gold embossing powder from Ranger. The repeated stamping and embossing done for background took lot of time, however, I hope I had done justice with the consistency of stamping and placement of die cuts in both the cards.

3. Later, I created die cut 'Thank You' word using alphabet dies for both the cardstocks.

4. Now, for one of the die cut 'Thank You', I used distress ink - Picked Raspberry and Spiced Marmalade and for the other die cut, I left the die cut as it was (white background).

5. I used distress ink - Peacock Feathers on the background of one of cardstocks and for the other cardstock, I left the background as it was (white background).

6. Moving further, I created another die cut "Thank You' word using orange coloured foam sheet as I wanted the die cut to pop-up. You can notice the same in one of the cards (white background). It very well coordinates with the white background and die cut. I took another cardstock, distressed the periphery using Picked Raspberry distress ink and adhered the same.

7. For the other card (blue background), I adhered panel of white cardstock.

8. Sentiment is from Altenew wild hibiscus stamp set. As you can see, for one of the cards (blue background), I have adhered glitter sheet.

9. I completed both the cards with use of sequins.

I am entering these cards for following challenges.
Paru's Card Making Challenge-Thank You Card or Tag
Mudra Stamps-Challenge#15 Love for Glitter
Addicted to CAS Challenge #123 - Leaves
The Flower Challenge - Challenge#14 CAS
AAA Cards - CAS Game#102 Ink Blending
CAS-ual Fridays - CFC186 Anything but a Card
Crafty Creations Challenges #354 Anything Goes
Time Out Challenges - Challenge#96 CASE with your own twist


Thank you for stopping by. I hope you like this project.
Have a wonderful day ahead!

Monday, 30 October 2017

Diwali Greetings - 2

Hi everyone,

I am going to share stencil card today, one of cards I made for Diwali.


I had used HNDMD stencil, Mudra Diya Mini stamp. There are plenty of ways, Diya stamp can be used. It is absolutely versatile stamp and value for money.

I am entering this card for following challenges.

Rainbow craftykari October 2017 challenge-Celebration & Lights


Have a fabulous week ahead!


Diwali Greetings!!!

Hi everyone,

Hope you had blissful Diwali and great start to new  year.

Today I am going to share a quick post on one of Diwali cards I made this year.

I had used papericious grey bloom pattern paper from my stash. I loved using new paper collection from papericious - Happy Diwali. It really made my task much easier and less time consuming for this Diwali.


I am entering this card for following challenges.

Papericious October challenge - All that glitters


Rainbow craftykari October 2017 challenge-Celebration & Lights


Craftsneed October challenge-Celebration theme


Thank you for stopping by! Have a wonderful day ahead !

Wednesday, 4 October 2017

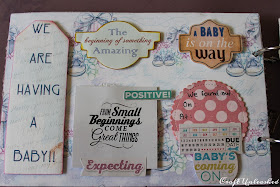
Pregnancy Journal : Expecting You !!!

Hi everyone,

I am completely in love with the project that I am sharing today.

It’s a pregnancy journal that I had started some time back. Finally, I could finish it off and it had turned out to be utterly adorable.

All the papers used are from lovely brand ‘Papericious’. They are my most favourite and most versatile paper making Company. For the cover page, I have used 3D shaker chipboard – womb from papericious. I had used lots of embellishments from the paper packs mentioned below:

Paper collections used are:
·         Mom to Be
·         Little Star
·         Happy Birthday
·         Ephemera

It nicely captures record of the amazing 9 months journey. Hope I could cover all important milestones that ‘to be parents’ goes through during this beautiful journey.

As pictures are worth thousand words so leaving you all with some of my favourite pictures showing how the journal looks like from inside.


Thanks for visiting !! Hope you like it !!! C u soon with Diwali projects.

Entering for following challenge:


Saturday, 16 September 2017

Over the Rainbow !!!

Hi Everyone,

Welcome to my first blog post...

I have a rainbow card to share with you all.

Have a look at my card.


I would like to explain how I made this card step by step.

1. I used SOMEBUNNY stamp from MFT stamps for creating a background and cutouts.
2. Took 4.25×5.5 watercolour cardstock.
3. Masked and made cloud background with green pistachio distress ink.
4. Using DCAM border dies, created Rainbow strips and coloured them using Zig clean clear real brush marker pens and glued them to cardstock.
5. Created clouds and bunnies ..I must say they look adorably cute. Coloured bunnies with Zig markers and placed them at the ends of beautiful rainbow.
6. Used the sentiment "Sending you hugs" just below the Rainbow....to give parallel effect.
7. Lastly, placed sequins from DCAM store to complete the look.

Hope you liked my card and please leave your precious comments below.

Entering my card for following challenges:


CAS-uaL Fridays "CASE a Girl Friday!" cased the colourful card made by Channin


Grab our button